Tuesday, June 28, 2011

How to make Korker Ribbon & Korker Bows


How to make korker ribbon
Have you ever wondered how to get grosgrain ribbon to twirl and stay twirled and make those cute funky bows with it? Well I always did and so I figured out what to do to make it and I am going to share with you the secret to korker ribbon! 
Tools needed to make korker ribbon:


  • grosgrain ribbon in different colors
  • wooden dowels
  • wooden clothes pins
  • cookie sheet
  • oven
  • ruler
  • scissors
  • hair clips
The first thing you will do is preheat the oven to 275.


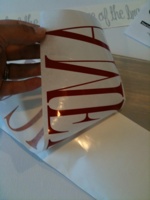
Next take the grosgrain ribbon and wrap it a couple of times around the wooden dowel and secure it to the dowel using the clothes pin as pictured below:
next wrap the ribbon down the dowel until you get to the bottom. I then secured the ribbon with the other clothes pin and cut the ribbon (make sure that you don't overlap the ribbon when you are wrapping the dowel)

After you have wrapped all the dowels and secured the ribbon on the dowels with the clothes pins set them on the cookie sheet and put them in the oven at 275 for 25 minutes.


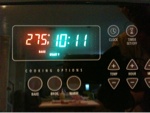
You might smell a funky smell as the ribbon heats up but don't be alarmed, that is normal. Just watch the ribbon and make sure that its not getting too hot. The ribbon will turn darker as it heats, don't worry it will go back to the original color when it cools.
 Take the cookie sheet out after 25 minutes and let the dowels cool. Once completely cooled take the clothes pin off one end and unravel the ribbon. The spiral should stay in place once taken off of the dowels. VIOLA! korker ribbon!!


How to make korker bows:
First measure out the korker ribbon to be about 3" long
Next lay out the cut ribbons that you want to use in your bow ontop of another flat ribbon in a coordinating color. You will want between 25-30 precut ribbons laying on top of each other like pictured below:
Next you will tie the flat ribbon together like you are tying a shoe lace. Tie it in a tight knot. Now you have your cute-n-crazy korker bow! Attach the hair clip of your choice on the underside of the bow by tying it on the clip with the extra ribbon you used. I also hot glue the bow onto the clip for extra strength. Snip the extra ribbon off and you have an adorable bow for your little girls hair!

You can use different widths of ribbon to make these bows. The pink and green korker is made with 3/8" grosgrain and the light pink and white grosgrain ribbon is 1/8". I like to use this size for baby bows.


 Get KORKEY & Have fun! -Alana

America...land of the FREE BECAUSE OF THE BRAVE!


I made this door sign for the July 4th. It says AMERICA-land of the free because of the brave. BECAUSE of the BRAVE men and women who fight for this right we have called FREEDOM...thank you to all who serve!


What you need to make this 4th of July sign is:
  • 1 wooden board, style of your choice
  • 1 can of spray paint, color of your choice. I used the Rust-oleum American Accents spray paint, color: Stone Gray
  • 150 grit sand paper, and a box to wrap the sand paper around to use and sand the sign, or an electrical sander
  • Vinyl lettering: AMERICA in red, land of the free because of the brave in blue
  • corker ribbon in red, white, and blue (optional)
  • pencil
  • ruler
How to make the sign:
-lightly sand the wooden cut out to make sure that it is smooth
-wipe the cut out off and make sure that all the sanded debris is off of the sign
-spray the wood with the spray paint. Apply an even thin layer of paint on the front, when dry turn the sign over and repeat on the back.
-when the paint has dried take your sand paper and lightly sand the sign all over until you get the desired look you are wanting (this is if you want a worn look. If not then skip this step)

-wipe all the sanded debris off the sign. 
-Next you will measure your letters from top to bottom. Mine were approx. 4" tall. Measure the depth of the sign and find the center. Mark on the sign with your pencil where you want to line up the bottom of the letters.
-gently pull the white shinny backing off of the letters. Start at the corner and pull at an angle SLOWLY! If the letters are not staying on the transfer paper gently rub the paper with your fingernail, this will help the letters stick onto the transfer paper, then pull apart again SLOWLY at an angle.


-apply the red AMERICA letters onto the line you marked on the sign
-rub the letters with a firm pressure using the side of a card. Go over each letter from top to bottom, side to side to make sure that the letters will adhere to the sign when you peel off the waxy paper.
-Gently pull the waxy paper off at an angle SLOWLY. If the letters begin to pull off the sign lay the paper back down and rub the letter again with the card.
-erase the line you drew to line the letters up.
-now measure the blue words: land of the free because of the brave, find the center and mark it. 
-gently peel off the backing from the words
-lay the words on top of the word AMERICA. Gently rub all letters and make sure that they have adhered to the sign.
-Gently pull the waxy paper off at an angle SLOWLY. If the letters begin to pull off the sign lay the paper back down and rub the letter again with the card.
-now decorate the sign with the corker ribbons (tutorial on how to make corker ribbon will be posted later this week)
-you can either use a stand to hold the sign to decorate a table or do what I decided to do and staple red, white, blue ribbons on the back to hang the sign from. 
Happy Independence Day! Have a safe and fun holiday!! AND thank you to all the BRAVE men and women for doing the job that I don't think I could do! 


Monday, June 27, 2011

A cleaver way to document a special occasion!

In January I welcomed a beautiful daughter that I named Ginger Lynn into this world. I wanted to document everyone that came to meet her in the hospital. I came up with a fun idea for her to be able to look back on when she grows up. I  too a mini photo album...(you know the cheap little brag albums that 4x6 size photos fit in)


 I had the nurse stamp her little feet on a piece of card stock with her name on it while they were stamping her feet onto the birth certificate to remember how small her cute little feet were the day she was born... aren't they so cute!? Plus this way there isn't a blank page in the front of the book...I should add her birthdate and time of birth and measurements on this page as well...I'll get around to that one day!


I then cut different colored scrapbook papers to a 4x6 size. When someone would come to the hospital to meet Ginger I would have them write her a little message on a piece of paper. Some were a welcoming message, while others were words of advice on life, whatever they felt like writing to Ginger was welcomed. I then took a picture of that person holding Ginger for the first time and slipped that into the left pocket of the album and their notes to Ginger on the right side. 


It is fun to go back a read what everyone wrote to her and it will be a fun keepsake for Ginger to look at when she gets older.
You could do this for any special occasion like a baby shower, birthday, graduation, a wedding, retirement, you name it!